Friday, September 30, 2011

JME Creations DT Brown & Blue Challenge


Today over at JME Creations the Design Team
was challenged to use the colors Blue & Brown.

I have a really hard time making cards for 
guys. So, I decided to take this challenge 
to a further level and make a card I could 
give to a guy and not feel like "was that
card to girly"


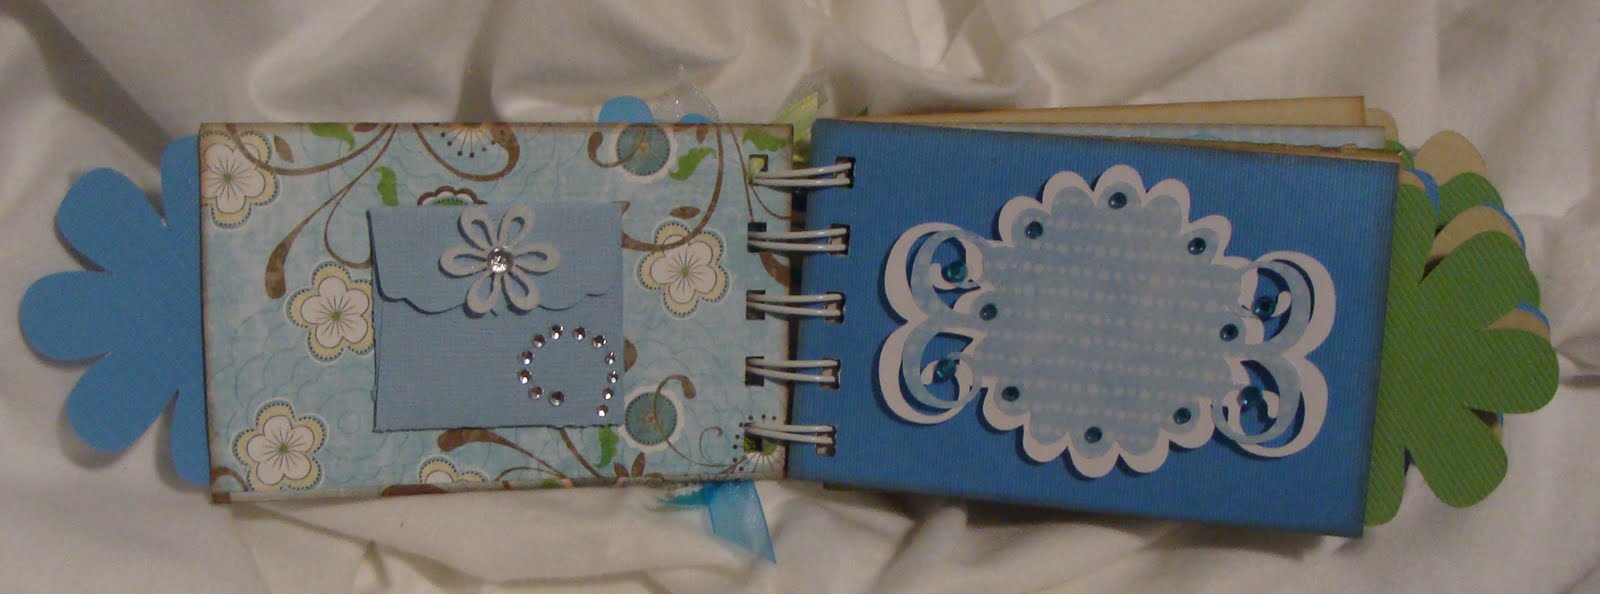
The card base is 5 X 6 1/2.  I found the stripped
paper at Michael's on sale this week for 5/$1.00
(and if you have the phone app you can get an
extra 20% off.)  The Squirrel with cut from Create
a Critter at 3 inches and the "Nuts about U" is cut
at 2 1/2 inches. 

All of my Design Team sisters did a wonderful
job on this challenge.  Please go to 
to check them out. 

I really hope you liked my card today.  Please stop
by again soon.

Sweet Wishes, Sharon

Thursday, September 29, 2011

Thankful Thursdays Fall/Halloween Blog Hop


Welcome to the Thankful Thursdays Fall
& Halloween Blog Hop featuring the DT.
If you are joining me from my design 
team sister Christle at
Then you are in the right place.

If you just happened across my blog and would
like to play along in our fun hop, you can go to
Crazy About Cricut at
and start at the beginning.
There are so many amazing and talented
ladies in this hop make sure to check out
each one.

I choose to use the Hello Kitty and Tags,
Bags, Boxes & More cartridge for my 
projects today.  I used the popcorn box 
for the treat box. I cut the box with the
fit to page button on.  It ended up being
4 1/2 inches tall.  The handle is a 2 inch 
wide strip of matching paper with a border
punch added to each side. Miss Hello 
Kitty was cut at 4 inches and embellished
with icy colored stickles to add that extra
sparkle.


This Hello Kitty Witch is made with the
 card feature button.  She is cut at 6 inches.
  And I had to add bling to her also.


The grand prize for this hop it the beautiful
Celebrate with Flourish cartridge.  To enter
you need to leave comments on all the blogs
in this hop.

Now that you have seen my projects for
today, please head on over to my DT 
sister Lola for another wonderful project.

Sweet Wishes, Sharon

Thursday, September 15, 2011

My Cricut Craft Room's Theme Day Thursday "Baby"

Today over at My Cricut Craft Room is Theme
 Day Thursday.  The Theme for today is Baby.
  Please hop on over to
to take a peak at what my wonderful Design 
Team Sisters have made today.

I am happy to announce my Sister In law & Brother
had a happy and healthy baby girl on 9/01/11.
Here is my new niece Sierra Rose. 
Isn't she just precious.


This baby card was made just for her. 


I decided to go with a Peach and Ivory color theme.
The card is 4 1/2 X 6 1/2.  I used the Stamping
Cartridge for both the butterfly and the "little one"
They are both cut at 2 inches.  


The paper is from the DCWV Nana's Nursery stack.
I found the ribbon at a place called "SCRAP" here
in Portland, Or.  They only sell items that people
would normally sell at garage sales or toss out.  
I Love going to SCRAP because they usually 
have vintage sewing items.  This ribbon was one
of those vintage finds.  It is called extra superfine
twilled tape.  I know Martha Stewart does sell a 
similar twill tape. The color of this ribbon 
matched perfectly.

I hope you enjoyed meeting one of my newest 
family members.  Please come back soon for more
"Sweet" projects.

Sweet Wishes, Sharon

Monday, September 5, 2011

Today my Design Team Sisters and I were
asked to make some thing with an APPLE
for our first DT project over at JME Creations.

Please head over to
to check out what my other amazing Design 
Team Sister created. 

I decided to make a treat basket for my daughter 
to give to her teacher on her first day of school.


The basket was cut from the 2010 Easter cartridge. 
I cut it out with the fit to page button. I thought it 
looked to flat so, I used my MS score board and 
scored it at every 1/4 inch going both ways. I then 
used a light brown chalk to make the lines pop out.

 The apple is from Doodlecharm 
and is 
cut at 2 1/2 
inches.  
I added the shadow 
to the back of the 
apple to give it 
some depth.

I hope you enjoyed my Apple treat basket. 
Thank you for visiting me today. Please feel 
free to leave me some Blog love.

Sweet Wishes, Sharon


Friday, September 2, 2011

Welcome to My Cricut Craft Room's 100 Cartridge Blog Hop

Welcome to My Cricut Craft Room's 
September's 100 Cartridge Blog Hop.


 If you are joining me from 
Then you are in the right place.


If you just happened across my blog and would
like to play along in our fun hop, you can go to
My Cricut Craft Room at
and start at the beginning.  
There are so many amazing and talented
 ladies in this hop.  The idea of this Blog hop
 is to show you all the ways you can use
 100+ Cricut Cartridges.
I had a BLAST making this Mini TP Album.


I have found out one of the tricks to get
the TP rolls flat is to iron them. Yes, I
said iron. For some reason when you iron
them it makes them the flattest I have ever
worked with. In the past I have just used a
bone folder and flattened the edges but, they
still puckered up. With this trick you will
never have to worry about them puckering.
For this Mini TP Album I used 5 different 
Cartridges. Accent Essentials, Story Book,
Cindy Loo, Paper Doll Dress Up & Tags,
Bags, Boxes & More.
Front Page:
I cut the flower for the front page starting 
at 2 1/2 inches and then went down a 1/2
inch for the next 4 layers.  The flower
was cut using Tags, Bags, Boxes & More
with the blackout feature.  The flower can be
found on page 107


I added ribbon to the binding make it more
girly.  As you look at each page you will
notice that I have added LOTS of BLING
 to give it a bit more sparkle.  Because what 
girl doesn't LOVE SPARKLE!

Page 1:
The envelope I used is found on page 76 
of Cindy Loo. It was cut at 3 1/2 inches.
There is a matching card inside the envelope.
Page 2:
The flower accent is found on page 36 of 
Story Book and was cut at 2 & 2 1/2 inches.

Page 3:
I cut a mat with my paper cutter for this page.
Page 4:
The Floral corners were cut from Accent 
Essentials on page 47.  They were cut at
1 1/2 inches.

Page 5:
The two felt flowers have ribbon for the stems.
Page 6:
For the oval I used page 50 from Story Book.
They were cut at 2 inches & 1 3/4 inches.
The fancy corners are also on page 50 of 
Story Book.  Those were cut at 1 1/2 inches.


Page 7:
I cut a mat with my paper cutter for this page.
Page 8:
This frame was found on page 57 of Cindy Loo.
It was cut out at 2 1/2 inches.


Page 9:
Lots of BLING.
Page 10:
I used Paper Doll Dress up for the floral
border on this page. You can find it on 
page 78.


Tags:
The tags that are sticking out of the pages
are cut depending on how wide and long
your TP rolls are.  The flower that is on the
end of the tags is cut from Tags, Bags, Boxes
& More with the blackout feature. You can 
find the flower on page 107.  


Now that you have seen mine go try
and make your own. And don't forget
to use your iron.
I hope you enjoyed my project.


For you next stop
Please visit my DT sister 
Shelly at:


Here is the lineup in case you get lost 
or need to stop along the way.


Your next stop is:


Sweet Wishes, Sharon