Thursday, November 25, 2010

Happy Thanksgiving!


I just wanted to take this opportunity to wish you and
your families a Happy Thanksgiving!! I am Thankful
for all my family and friends like you. I hope you
all had a great fun filled Thanksgiving!! Now I am
off to bed so I can go shopping bright and early
with my wonderful husband.
I love you honey!!

Tuesday, November 23, 2010

Halloween Explosion Box

I always wanted to try out an Explosion Box so, I figured
why not a Halloween one. I made this one for Emily's
teacher because she appreciates all my craftiness.


Best Buy Demo table

I was hired to give demos at Best Buy. This was the job
of a life time. Only to last a very short 4 weeks. I am
still holding out hope that Provo Craft will hire us again.


Emily's cupcakes

Emily wanted to learn how to decorate cupcakes.
I filled a decorating bag with frosting and showed
her how to frost one. She was off and running with
the decorating after that. Don't these just look Yummy!!

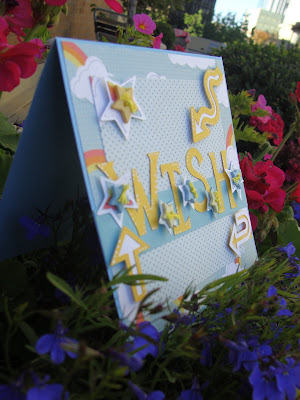
The challenge for this card was to use
arrows. I used Alphalicious for the font
and Accent Essentials for the arrows.

I thought it needed some extra depth. So, I added the
star buttons to the star cuts and then pot dotted them.


Emily's swim party

I made this paper doll card for Emily's 10th birthday.
She had a swim party and I thought that this paper doll
with her swimsuit and accessories were perfect.


These are the treat bags all the children took home.
I like to go a little over board. I figure my girls are
not going to be little for very much longer.


Here is the invitations I made for her party. She wanted
a flip flop. I didn't have a cartridge that had a flip flop on
it so, I just traced one of hers. All the party information
was printed on the computer and added to the other side.
I think they turned out great and she loved them. Of
course we had to have blue ones for boys and pink
ones for the girls.


Thursday, November 11, 2010

Dear all my wonderful friends,

I'm back!! Where have I been?? Well, here and there is all I can say. I don't know where my imagination went. I have been just not motivated to get anything done for a while now. But, I promise I am back now!! Thank you for all your wonderful comments. Now on with what I have done in the last few months.

Sweet Wishes ~Sharon~

Monday, May 17, 2010

My family was so busy the week of Teacher Appreciation
that I decided to make them cookies this week. I think
I will send a little something every week as a surprise.

I just bought my first set of Nestabilities. So, of
course I had to try them out. I cut the toppers
for the cookie bags with the largest die, folded it
in half, chalked it with white, found a stamp
I thought would go with it (also found out I need
more stamps with words) and then added a flower
that Emily cut out for me with her Cuttlebug. She
thought that it looked to plain so we added the button.
The girls said the teachers loved them!

This weeks challenge over at Frosted Designs

The challenge this week over at Frosted Designs was
to use the colors of the rainbow. I choose to use
the rainbow cut from Hello Kitty. I cut the
rainbow at fit to page and added some colored
skittle drops. The clouds were then covered
with stickles to make them sparkle.


Thursday, May 13, 2010

Have you ever seen those 1 800 flower commercials??
You know, the one with the little while fluffy
characters called the Warm Fuzzy Feelings.
Well, my daughter Emily thought that our
whole family need some Warm Fuzzy Feelings.
So, she made her own and gave them to everyone
this last weekend. I am so proud of her imagination.
I told her I would post her project on my blog.

I know she would love some happy thoughts about
her Warm Fuzzy Feelings.

Thursday, April 29, 2010

This weeks Challenge over at Frosted Designs

Our challenge this week was to use the colors Aqua,
Lime Green & Brown. I was in the mood for a
Popsicle and we didn't have any left. So, I decided
to make my own. I used the Cricut cart Doodlecharms
and cut the Popsicle at 6 inches. The Embossing was
done with the Cuttlebug. The folders I choose to
use were dots and wood grain. I love how the wood
grain embossing makes the Popsicle sticks look real.
I chalked the dots with white to make them pop and
added Aqua stickles. The tag was cut from Tags, Bags,
Boxes & More at 2 inches.

Thank you for looking!! Now I challenge you to go make
your own Popsicle and post it to your blog. Anyone up for
the challenge??

The Yummy stamp is a dollar Studio G stamp from
this summers collection. I thought the flower gave
the Popsicle a grown up summer feeling.


Here is my Big 10 year old!! She was so
happy to get her dream book.

Thursday, April 8, 2010

This weeks Challenge over at Frosted Designs

Our Challenge this week was to use the word DREAM.
I decided to make Emily a Dream book for her 10th birthday.
She has the best dreams and they always amaze me.
I used a compation notebook for this project. The
words were cut out using the Hello Kitty cart. Clouds
and shooting stars were cut from Everyday Paper Dolls.
And I found the moon on the New Arrival cart.

The clouds were ran through the cuttlebug
using the swirl folder, inked and then painted
with clear stickles glitter. I sanded the edges
to soften them up. I thought the ribbon added
a girly feeling along with the extra bling. I hope
she loves it. Because I know I enjoyed making it!


This weeks Challenge over at Frosted Designs

Our challenge this week was to use the colors Hot pink,
Lime Green & Black. I used Mini Monograms for the
scalloped square and circle. The Strawberry is cut from
the Indie Art Cart. I added bling to bring out the seed
spots. The lime green was embossed with the cuttlebug
using the circle folder.


Saturday, April 3, 2010

This weeks Challenge over at Frosted Designs

I know I am a week late posting my project.
But, once again life just took over and time flew
by way to fast. So, here it is. I hope you like it.
Our challenge this week was to use something
clear on our project.
I made the pins with the post you use to make
jewelry. I put a drop of super glue on each
end so they wouldn't slide off. I attached them
so they could be removed and used on another
project if the receiver chooses to do so.

Friday, March 19, 2010

This weeks Challenge over at Frosted Designs

Our challenge this week was to think spring. We were to
include flowers in our project. I decided to enter
two projects this week. The first one is a gift card
holder made with TP rolls. All the cuts for this
project were from Walk in My Garden.
To make the TP roll gift card holder you flatten out 2 TP
rolls. I found out the easiest way to do this is to get
them slightly wet. Then place a phone book on top of
them for a couple days until they are dry. After they are
dried measure the length and width of the TP roll and
add 3/4 inches. This will be the over lap for the back
and the paper that you tuck inside the roll.
Take the paper with glue on it and wrap the TP roll
around it. Then tuck the sides in.
To make the holes on the side I used my crop a dile. And
binder rings to bring it all together. I had to add lots of
ribbon to make it feel like spring.
For the cards inside the tubes measure the width and
length and make slightly smaller so they don't fall out easily.
I then added lots of spring cuts from WIMG.
These are the perfect size for any gift card. I added
a Starbucks gift card to the last page.

For my second project I used the flower pots made with
more flower cuts from WIMG. I cut out 3 different flowers
in 3 different sizes and 6 different colors.
After I stacked and glued the flowers I crimped, curled
and folded the flowers to give them more depth and texture.
Once again I used my Crop a dile to make the holes in the
center of the flowers for the suckers to go through them.
The butterfly was cut out once and then again with the
flip button on. They are stacked together with a jumbo
paper clip in the middle. They can now be used as a book
mark. The name tags were also made with WIMG.
To put it all together I added styrofoam to the inside of
the clay pot. To hide the styrofoam I shredded green tissue
paper and then just added the flowers until they looked full.

Thursday, March 18, 2010

I made 80 of these for my daughter's class.
They both said they were a big hit.
I used Designer's Calendar for the shamrock
and pixi sticks for the stem. Of course what
child doesn't love pixi sticks.


Thursday, March 11, 2010

Last Friday Emily's school had BINGO night. Each
classroom was asked to make a BINGO basket to
be raffled off at the end of the night. Her class choose
to make a baby basket. I sent in lots of baby items but,
decided to add my own little crafty touch to these baby
wash cloths. I folded them in fours and then rolled them
up to look like roses. I added a dowel for the stem and
wrapped them in tissue paper. The bouquet turned out to
be the perfect addition to their basket.

Wednesday, March 10, 2010

This weeks challenge over at Frosted Designs

Our challenge this week was to use a stamped image
in the background of our project. I decided to make
a card for St. Patrick's Day. I used a St Patrick's Day
stamp from the Studio G line and randomly stamped
the background of the shamrock. After I stamped it
I used the Cuttlebug swirl folder to emboss the
background. The background shape is made from
the Accent Essentials Cricut cart.

The shamrock is made up of 4 hearts cut out from George
and Basic Shaped Cricut cart. I them ran them threw the
Cuttlebug with the dots folder and a floral folder. The
stem is cut from the Accent Acentals Cricut cart. To tie
it all together I added a sheer cream bow.


Thursday, February 25, 2010

This weeks Challenge over at Frosted Designs

Our challenge this week was to incorporate our

own handwriting in a project. I choose to make
the cake box from Tags, Bags, Boxes & More.
And add a simple post it note pad to match.

The cake box was cut at 9". The flowers were cut
using Accent Essentials. At 3 different sizes,
inked and then ran through the Cuttlebug
using the dots folder. Yes, there is Bling in the
center of the flowers. The lace on the sides
is the Martha Stewart lace punch. It too was
ran through the cuttlebug and then inked. The
dripping frosting is another Martha Stewart
punch called drippy goo.

The paper for the post it note pad is from
the DCWV Sweet Stack. I thought it was
a perfect match with it being chocolate
brown and having the lace on the side.


I made this sign for my Grandpa's Birthday Party.
I used the Hello Kitty font for the words and
Celebrations for the balloons and party hats.
The sign was 82 x 22.

In the middle of the two stars they have
peppermint patty. The star is cut
from Doodlecharms and then embossed
it with the swirl folder.


Wednesday, February 17, 2010

This weeks Challenge over at Frosted Designs

Our challenge this week was to use both polka dots and plaids.

This was a very unusual challenge for me. Because I never
thought those two prints could go together. But, as you
can tell I got them to work out great!!

Once again I used one of my favorite carts
Doodlecharms for the cupcake. And the dots folder
for the cuttlebug. I used my Martha Stewart score board
to make the lines on the cupcake for the wrapper. And
then ink calked it with white to make it stand out better.


Thursday, February 11, 2010

I made 10 of these little boxes for my
daughters teachers and staff at school.
This little box holds 3 Ghirardelli chocolate squares.
These are so easy to make! You can get the directions here:
These are the Valentines my 9 year old helped me
make to give out to all of her friends. We made
40 of them. 34 of them were for just her class.


Wednesday, February 10, 2010

This weeks Challenge over at Frosted Designs

Our challenge this week was to use a star.
I decided to use this challenge to make my
Grandpa his 85th Birthday card.

I used a paper pack from Autumn Leaves by
Rhonna Farrer. I received this paper as a gift from
a friend on the Cricut Message board. So, I am not
sure where she got it from. The letters and stars were
cut out from the Cricut cart Doodletype. The stars and
background were embossed using the cuttlebug folders.


Wednesday, February 3, 2010

This weeks Challenge over at Frosted Designs

The challenge was to make a valentine
without using pink or red. So, I decided
why not purple and brown? Purple is one
of my very favorite colors.

This was the first time I used my sewing
machine on a card and I really like how
it turned out. And of course I had to
use some Bling.

Tuesday, February 2, 2010

My sister has a friend who bought a Cricut for Christmas.
So, for her birthday present I will be teaching
her and a few of her closest friends how to
make the following projects.

The first project is the Cake Box from
Tags Bags Boxes & More.

I used the flower cut from Accent Essentials.
The border was made with the Martha Stewart
Lace punch and embossed with the
Dots Cuttlebug folder.

The second project is a simple Post-It note pad.