
Welcome to My Cricut Craft Room's
September's 100 Cartridge Blog Hop.

If you are joining me from
If you just happened across my blog and would
like to play along in our fun hop, you can go to
My Cricut Craft Room at
There are so many amazing and talented
ladies in this hop. The idea of this Blog hop
is to show you all the ways you can use
100+ Cricut Cartridges.
ladies in this hop. The idea of this Blog hop
is to show you all the ways you can use
100+ Cricut Cartridges.
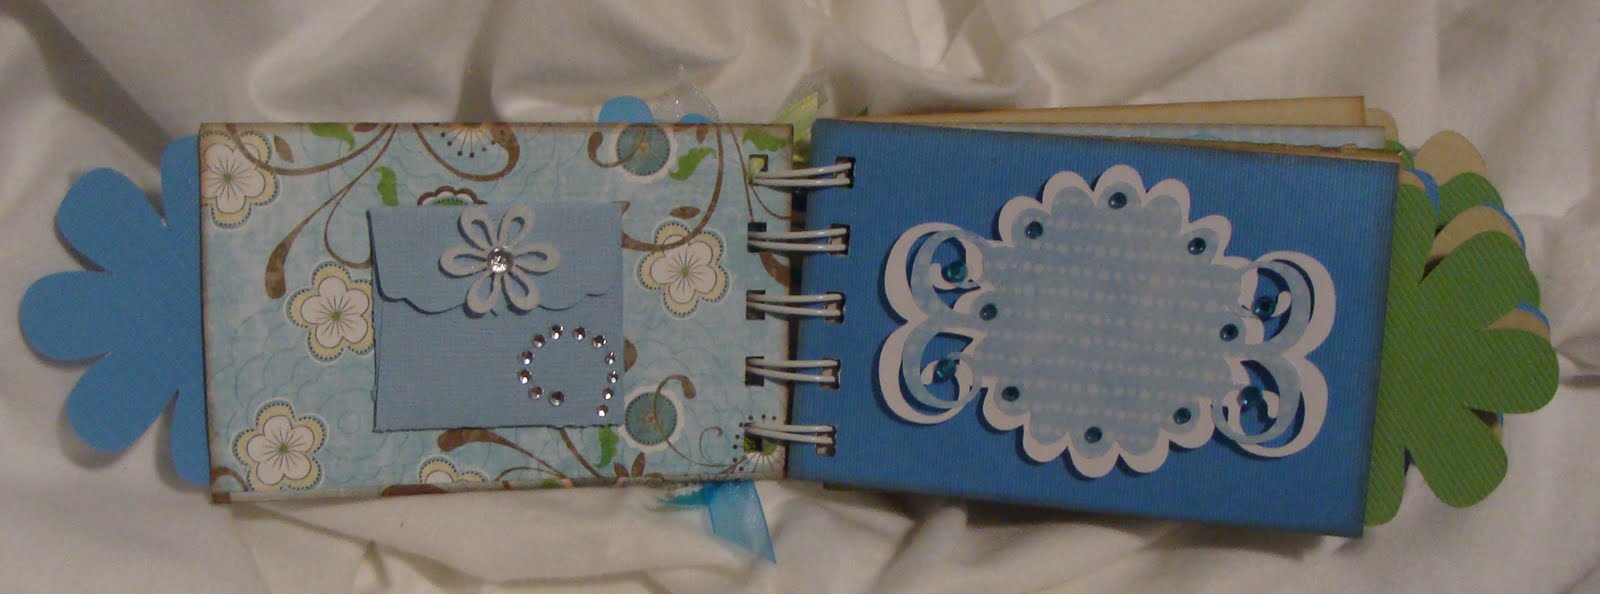
I had a BLAST making this Mini TP Album.
I have found out one of the tricks to get
the TP rolls flat is to iron them. Yes, I
said iron. For some reason when you iron
them it makes them the flattest I have ever
worked with. In the past I have just used a
bone folder and flattened the edges but, they
still puckered up. With this trick you will
never have to worry about them puckering.
For this Mini TP Album I used 5 different
Cartridges. Accent Essentials, Story Book,
Cindy Loo, Paper Doll Dress Up & Tags,
Bags, Boxes & More.

Front Page:
I cut the flower for the front page starting
at 2 1/2 inches and then went down a 1/2
inch for the next 4 layers. The flower
was cut using Tags, Bags, Boxes & More
with the blackout feature. The flower can be
found on page 107
I added ribbon to the binding make it more
girly. As you look at each page you will
notice that I have added LOTS of BLING
to give it a bit more sparkle. Because what
girl doesn't LOVE SPARKLE!
Page 1:
The envelope I used is found on page 76
of Cindy Loo. It was cut at 3 1/2 inches.
There is a matching card inside the envelope.
Page 2:
The flower accent is found on page 36 of
Story Book and was cut at 2 & 2 1/2 inches.

Page 3:
I cut a mat with my paper cutter for this page.
Page 4:
The Floral corners were cut from Accent
Essentials on page 47. They were cut at
1 1/2 inches.

Page 5:
The two felt flowers have ribbon for the stems.
Page 6:
For the oval I used page 50 from Story Book.
They were cut at 2 inches & 1 3/4 inches.
The fancy corners are also on page 50 of
Story Book. Those were cut at 1 1/2 inches.

Page 7:
I cut a mat with my paper cutter for this page.
Page 8:
This frame was found on page 57 of Cindy Loo.
It was cut out at 2 1/2 inches.

Page 9:
Lots of BLING.
Page 10:
I used Paper Doll Dress up for the floral
border on this page. You can find it on
page 78.
Tags:
The tags that are sticking out of the pages
are cut depending on how wide and long
your TP rolls are. The flower that is on the
end of the tags is cut from Tags, Bags, Boxes
& More with the blackout feature. You can
find the flower on page 107.
Now that you have seen mine go try
and make your own. And don't forget
to use your iron.
I hope you enjoyed my project.
For you next stop
Please visit my DT sister
Shelly at:
Shelly at:
Here is the lineup in case you get lost
or need to stop along the way.
Sweet Wishes, Sharon


Beautiful mini album Sharon! I just love the colors and patterns you worked with and each page has such pretty details. I will have to remember your tip about using the iron...would have never thought of that one, thanks for sharing!
ReplyDeleteHi Neighbor... (my blog is directly after yours in the hop... my name is Shelly... not Samantha.) I absolutely love love love your TP mini album!! You did a FANTASTIC job!! So much detail to every page. I am going to have to try to make one of these. Thanks so much for sharing it with us! You are very creative!
ReplyDeleteI have never made anything like this and you have truly inspired me to try :)
ReplyDeleteGeorgous!!!
ReplyDeleteI love this little book. did you say how you bond it with those spiral rings? would love to know
ReplyDeleteI love your album! Thanks for sharing.
ReplyDeletewow! great job and thanks for the tip about the iron! I never would have thought of that!
ReplyDeleteWhat a great TP mini! Love what you did with the tags!
ReplyDeletewhat an awesome lil album - I will start saving my rolls... new follower :)
ReplyDeleteparkernana5@cox.net
Thank you for sharing your pictures and great tips. I can't wait to try and make an album.
ReplyDeleteGreat tips! I would LOVE to make a TP album but I have not attempted it yet.. Thanks
ReplyDeleteHeather
GREAT Book!!! and a joy to visit your blog thanks
ReplyDeleteThanks for the tip on the tp rolls. I was saving a few to make an album and didn't like that they would not lay flat....threw them all in the recycle bin!
ReplyDeleteI have been wanting to try making one of these albums. I will file away the ironing idea! Adorable album!
ReplyDeleteelegant and girly love that blue im going to try this myself thank you
ReplyDeleteBeautiful I would never have thought to use tp rolls how cool is that. what a great job and thanks for the great idea.learn something new evry day. thanks for sharing and for the chance to win
ReplyDeleteabbraddock@msn.com
Beautiful TP mini and I like the iron tip I would love to make one of these but every time I change the TP roll my dog comes tearing into the bathroom, this is one of her favorite toys! LOL!
ReplyDeletethis is the easiest to follow and cutest to have tp album i've ever seen. you did wonders and i love the papers and colors you've chosen. may just try my hand at this.
ReplyDeleteCan I just say gorgeous! Love the colors you used and how you incorporated so many cuts from so many different carts.
ReplyDeletelflinesatcomcastdotnet
Your mini album is so beautiful. I love all the details. I haven't tried to make one yet but I really do want to try. Thanks for your tip too.
ReplyDeleteKris
dietzrobles at yahoo dot com
Ha ha, the iron works well. Your book is beautiful and well organized. Love it.
ReplyDeletehttp://blog.neatthings-boutique.com
Such a lovely project! Its great! Thanks for sharing how to make one!
ReplyDeleteHolly
hollyshobbie at gmail dot com
lovely project love the flower
ReplyDeleteThat is a great mini! I love the colors and flowers and the bling! I love it all!!
ReplyDeletemy-o-scrappin.blogspot.com
smmyiow@gmail.com
I was pretty excited to see your beautiful and well made project! I saw another on CARDZ TV and the gal used it as a scripture book. I just loved it. I'll have to try my hand at this. tfs....:O)
ReplyDeleteOh I love you mini and all the bling. Wonderful project.
ReplyDeleteI love your project!! Thanks for the ironing tip and I'm gonna try this! Christina :)
ReplyDeleteGreat job.. who would know that the TP roll could "clean" and be such a beautiful mini album. Your colors are great together.
ReplyDeletewow what a beautiful lil mini, i love the colors and papers you used.
ReplyDeleteEva :0)
http://evasscrapsncards.blogspot.com
I have a giveaway on my blog right now
SO beautiful! Now I have to start saving my TP rolls! I already have coworkers saving the backing from our many packages of forms! TFS!
ReplyDeleteI love it!!
scrapbug@live.com
Very beautiful album!! I can't believe that it started with toilet paper rolls!
ReplyDelete-Samantha
samanthascricutcreations.blogspot.com
Beautiful album! I can't believe it was made from toilet paper rolls1 That's amazing! Thanks so much for sharing!
ReplyDeleteLove your mini album! How creative :) TFS
ReplyDeleteJenny
jennykingham at att dot net
love this mini alblum it is beautiful TFS
ReplyDeleteI want to try this! Great Job! Love the colors and huh who would everthought ironing! Thats a great tip! Thanks! Amazing job
ReplyDeleteNice TP mini. I made my first one tonight. I put a giant jar of marbles on mine to flatten it up, next time I will iron though, yhanks for the tip.
ReplyDeletecathyplus5.blogspot.com
So pretty! I love doing those mini albums, too:-) TFS!
ReplyDelete~Tammy S
Your mini album is so gorgeous!
ReplyDeleteTracy
www.scrappininthewoods.blogspot.com
What a beautiful mini album. You certainly put a lot of work and effort into it.
ReplyDeleteI really appreciate how you put the page number for each cartridge that you used. So helpful for us "new" cricut lovers.
Happy scrappin!
so sweet love it...TFS!!!!
ReplyDeletecathie
scraphappyca@gmail.com
Love it! I have been wanting to make one of these.
ReplyDeleteTP mini album?!??! Who would have thought??? I just love it, thank you for sharing I will try this out
ReplyDeleteLiz
17eroses@gmail.com
I've never heard of the TP mini album. I guess I'm behind in this world. I'm still making my first mini paperbag album. I may have to try this one next. Thanks for sharing.
ReplyDeleteLaurie F.
laurieanne@charter.net
Beautiful Mini Album...I love all the colors and papers. TFS!
ReplyDeleteI never knew about TP albums! Going on my list of things to do! No shortage of supplies here! LOL! Yours is amazing...love all the bling, the little envelope, everything! Thanks for the tip!
ReplyDeletelove your tp mini! i love the clors you used! tfs callyann(follower)
ReplyDeletehttp://callyanncraftycreations.blogspot.com
What a beautiful album!
ReplyDeleteI love your mini alblum. I have been putting aside some rolls to try something similar. Thank you for the tip about ironing them! I am sure this will make things go a little easier!!
ReplyDelete